Showing posts with label Pick of the Week. Show all posts

Monday, February 25, 2019

MY PICKS OF THE WEEK FOR THE HOUSE THAT STAMPS BUILT

Hey there House friends!!! 

It's Cheri and it's my turn to select some awesome Repeat Impressions Stamps for you this week, which you can purchase for 20% off....but hurry, the discount is only for one week!!! 

My picks are RI#4216-M Gray Wolf, 815-N Moose, 4218-K Whitetail Deer and Fawn and 1112-E Just a Note.  

A little back story:  I was in a local Hallmark store a few weeks before Christmas this past year, picking up my traditional Hallmark tree ornaments, and I over heard a man blowing out frustrating groans while looking at the selection of packaged card sets.  He offhandedly said, "all I want is to find a package of note cards for a guy".  A sales clerk stepped over to him and asked if she could help and he told he was looking for a package of note cards for his son to give his male teacher for a Christmas gift.  

Well, that's all this card maker needed to hear to set the wheels in my head turning, and I thought for my next POTW I would create just such a package of cards, and this is what I came up with.  There are two of each image in the package for a total of 6 cards.  


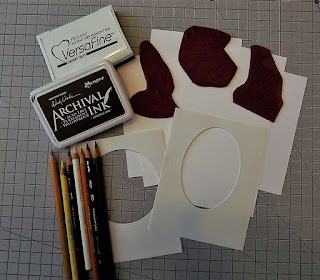
To create this set of cards here are the supplies I used:  My selection of stamps, an ink (VersaFine Smoky Grey) for sponging the background, darker ink for stamping, and colored pencils for coloring (you could use whatever coloring medium you like).  


I made the masks using a circle die and an oval die and cut them on simple copy paper...the thinner the better then sponged the ink inside the mask.   


Using my MISTI stamp positioner (extremely helpful for this technique), I stamped the image within the area of the sponging where I wanted it to be.  I did this with each image.  


I used the same color of pencils to lightly color in specific areas of each of the images for highlight and continuity.  I kept the colors neutral and earthy in order to give the stamps the spotlight.  

Here they are singly...


Monday, December 31, 2018

MY PICKS OF THE WEEK FOR THE HOUSE THAT STAMPS BUILT

Happy New Year, everyone!!!!  

I'm here with my stamp picks for the week of December 31.  The stamps are discounted at 20% so grab them while you can.  

The stamps I've selected for you are RI#10201-W "Flower Power Background", 10307-H "Patti's Flower Outline", #10303-H "Kathy's Flower Outline", #10313-H "Daisy Outline Large", and #2501-H "Happy Birthday From..."

Here's how I put them together on a monochromatic card.


Here are the supplies and the process for creating this card


Supplies:  VersaMark Ink, embossing buddy, card stock, vellum, scissors, embossing powder, Copic Markers (or coloring medium of you choice) and a heat gun (not shown).  


After treating a teal card stock panel with an embossing buddy, Flower Power Background stamp was inked with VersaMark and stamped on the panel.  (I used a MISTI stamp positioner).  I sprinkled white embossing powder over the panel and heat embossed it.  

The three outline individual flower stamps were stamped the same way only onto a piece of vellum paper that is heat tolerant. (Bazzill makes one).  I then fussy cut the vellum pieces.   


Here's another look at the end result after putting the card together.  As a final detail and for more dimension I used Ranger Enamel Accents. 


  Thanks for stopping by today.  Don't forget to grab these stamps while they're discounted 20% from today until Sunday, January 6.   


Monday, November 5, 2018

MY PICK OF THE WEEK STAMPS FOR THE HOUSE THAT STAMPS BUILT

Hi House Friends!  

I've been playing around (and having so much fun) with the Ranger Alcohol Lift Ink.  Some of you may have seen the cards I created previously using the Alcohol Lift Ink, now I thought I'd show you how I play with it today at The House That Stamps Built bloghttp://thehousethatstampsbuilt.com.  

All the Repeat Impressions Stamps I'm using in this post will be available to you for 20% off Until November 11, 2018.  Grab them while you can.  Use discount coupon POTW11518

You need these supplies:


Alcohol Inks (your choice of colors), Yupo or any non-porous paper, A separate piece of card stock (I used white), Alcohol Lift-Ink, Blending Solution (optional), plastic gloves (optional, but they make it less messy on your hands), stamps of your choice.  


This photo shows the results of using the Alcohol Blending Solution (left) and just the blending of the alcohol inks alone (right).  You can decide which you'd prefer for your project.  I'll be using the one on the right for my project today.  Before stamping, it's very important to let these papers dry completely.  


You're next step is to place your alcohol ink Yupo paper and your card stock side by side.  Inking up your stamp with the Alcohol Lift-Ink, stamp it on the Yupo paper.  I let the stamp sit on the paper for a minute before lifting.  I then place and stamp the inked stamp on my card stock piece and turning back to the Yupo paper, I take a soft cloth and tap the image inked area on the Yupo paper, lifting the ink and seeing the magic. (Note:  Be careful not to wipe the cloth over the image or it will smear)  
Both results are posted in the next photo. 


Finally, use your images as you'd like.  I made a couple of Thanksgiving cards using these RI Stamps, #3308-M "The Pastor's House", #3214-G "Thanksgiving Blessings", #3306-I "Falling Leaves" and #3313-E "Oak Leaf".  


I hope you enjoyed this little tutorial, thanks for stopping by. 


Monday, September 10, 2018

MY STAMP PICKS OF THE WEEK FOR THE HOUSE THAT STAMPS BUILT

Hi House friends, 

I'm here with new stamp Picks of the Week for you.   

I've been having a lot of fun lately creating Artist Trading Coins.  These are similar to Artist Trading Cards, in that the process is the same, it's the size and shape that makes these different.  Where ATCards size must be 2.5x3.5 inches, ATCoins must be 2.5 inches in diameter.  

My stamp picks for my project are RI #9009-F "Butterfly Sm.", #108-F "Butterfly", #4404-F "Dragonfly at Rest", #4405-K "Dragonfly Deco", #1709-G "Fern" and #3103-F "Live For...".  You can purchase all of these stamps for the next week at 20% off the list prices.  BIG savings!!! 

Here are my ATCoins  


Here are the supplies and the process I used.

Watercolor paper, Distress Oxide Inks, craft mat, Black Archival Ink, a punch, die or template that measures 2.5 inches in diameter.  Not shown, watercolor pens (or color medium of your choice), Stencil, white and black acrylic paint for splattering.  


Smoosh Distress Oxide Ink, one at a time and drying each color before applying the next, on your craft mat and spray with a little water.   


With a panel of watercolor paper, slap, dip, drag it through the watered ink on the craft mat.  Dry the ink on the paper.  Apply second and third colors the same way.


Note:  I used two watercolor panels in order to get 4 coins from them. Once you've achieved the color look you want and the panel (s) are completely dry, use your punch, die or template and cut out your coins.  


At this point, I added some background stenciling and acrylic splattering for additional interest and texture.  I dried each coin and then using Archival black Ink, I stamped the images I was going to use, including the fern, in order to get an idea of where the fussy cut images (below) would be on the coins.


On a separate watercolor panel, using Archival Ink (use any waterproof ink), I stamped the images I would be using. I then colored them with watercolor markers and fussy cut them from the panel.


Once each image was cut I then adhered them over the stamped image for it on the coin.  For a final touch, I stamped the sentiment "Live" from the sentiment stamp in VersaMark ink and heat embossed it with copper embossing powder.  

I hope you found some inspiration here and this wasn't too lengthy. This process isn't as intimidating as you might think.  It does take some time using my process, but there are many other ways to create ATCoins out there.  Check them out and have some fun making ATCoins!  AND be sure to get your Repeat Impressions Stamps that I've used here at the 20% off discount before it's expired on Monday, September 17th.  


Monday, July 16, 2018

PICK OF THE WEEK FOR THE HOUSE THAT STAMPS BUILT

Hi there, Cheri here with a fun little technique you can try.  It's called painting with inks on kraft.  

You'll need some kraft cardstock and open line stamps such as the ones I've used in my projects today.  RI#1508-P "Vine Corner Border", #1001-P "Blueberry Border", #1317-L "Vase of Tulips", #2512-E "Just a Note" and 8607-D "Thanks".  

For one week only, these stamps are being offered at a 20% discount.  So, grab them while you can at this fantastic discount.


Here are the supplies you'll need to recreate this technique. Distress Ink reinkers (you could use any inks even ink pads), white pigment ink, white embossing powder, and (if you'd like shimmer) Perfect Pearls.  Not shown:  Embossing buddy, MISTI stamp positioner and heat gun.


To begin, cover kraft cs with embossing buddy or some other anti-static tool.  Then, stamp open lined stamp on kraft in white pigment ink making sure to get a good impression with the pigment ink.  (that's when the MISTI comes in handy).  Then, sprinkle on white embossing powder over stamping and heat emboss.  


On a craft mat or some waxed paper or freezer paper, drop very small drops of the color reinkers you've chosen add a small spritz of water off to the side to help dilute the inks.  With a small brush, pick up a little water and a little ink.  Have a piece of scrap of the kraft cs on hand to test the color and a paper towel to help absorb extra water or color.  "Paint" inside the white embossed areas.

When you're painting is complete, clean up your area of excess inks.  Mix a small amount of water (spritz again), and a little scoop of Perfect Pearls and paint the area again with the shimmer if you like.  I like the shimmer so I added it to my images.  

There you have it!  Easy, isn't it? You can now finish your project as you like.  I hope you found some inspiration here today and I encourage you to experiment with inks you have and see what you come up with.  

Thanks for stopping by and don't forget to grab the stamps I've used before the 20% discount runs out in one week.  


Monday, January 29, 2018

PICK OF THE WEEK - FLORAL ARTIST TRADING CARDS

Hi everyone,

Cheri here with my pick of the week for you.  I don't know about you, but I'm getting tired of snow and cold, so I decided to pick some flowers and spray some vibrant colors around my snowy world to share with you.  I love making ATC's so I picked that as my way of showing off the flowers.  

The stamps I used on my ATC's are RI#4308-J "Lilly of the Valley", RI#904-L "Daffodils", RI#1320-M "Spring Blossoms", RI#5125-C "Dragonfly Sil, Sm" and the sentiment is from the #9900 "Hello Series", the word "love".  

Here are the supplies I used:  Heavy gesso (but you can use any gesso), six ATC cards (2.5x3.5) cut from 140# watercolor paper, water in a spray bottle, various round, found objects, inks/paints (I used ColorBursts pigment powders), paint brush and Washi tape.


I first connected my ATC cards together with Washi Tap.  This is not removed and becomes part of the background.  


I then sprayed the whole area with water and sprinkled on the pigment powder.  I choose three colors and let the pigments work with the water adding more water and powders where I thought they were needed, being careful not to add too much in order to avoid muddying the inks. 


I then sopped up the excess with a paper towel.  Such pretty results.


Keeping the panels together, I dried them completely with my heat gun (you could also let them air dry), but they have to be completely dry before starting the next step of applying Mod Podge (This should have been added to the supply photo)  


Dry completely again and using the found, round objects I dipped them in Gesso and "stamped" circles around the panel.  Once again, dry completely before moving to the next step of separating the ATCs.  I used a ruler and my craft knife, but you can use whatever you have to separate them cleanly.  There were a few pieces of Washi Tape that needed to be stuck down again and I used little bits of wet glue to do that.  But the Mod Podge should have sealed them well.  


The next step is to stamp on them.  Because I used Mod Podge to seal the cards, I needed to stamp my images with an ink like StazOn that stamps on non-porous surfaces.  If you don't use Mod Podge any dye or pigment ink may work fine.  I let the StazOn ink dry completely (I left them overnight).  


Now I have six beautiful ATC's.  See how the Washi Tape gave an additional interest to the background?  Love it!  


Thanks for stopping by and I hope you enjoyed my Pick of the Week!  

For this week only (Jan. 29 – Feb. 4, 2018), get 20% Off the stamps I used in this project when you use the coupon code POTW12918 at the Repeat Impressions store.  

Blog Archive

I hope you enjoy some of my cards

Please sign my guest book