Wednesday, September 11, 2013

DESIGNER'S CHOICE CHALLENGE AT REPEAT IMPRESSIONS

Hi there blog friends!

Wooohoo!  Do you know what day it is???  Do you know WHAT day it is????  (are you sick of that commercial?)  Yes, it's hump day and here at The House That Stamps Built Wednesdays are either What if? Wednesday sketch challenges or Designer's Choice Challenge and THAT'S what day it is!!!

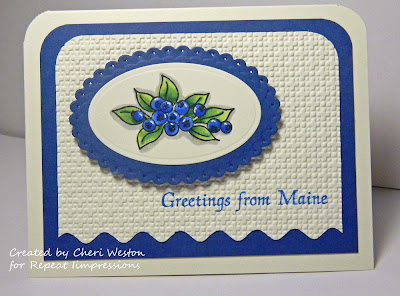
It's my turn to challenge you and my fabulous Rock Star team mates this week and my challenge is called "Tuti Frutti/Food Happy".  To begin the challenge here is my card

The Repeat Impressions image I used for my card is #2707-I "Large Berry Cluster"  and #1145-F "Greetings from Maine". 

I made this card with scraps I had laying around my craft table....coloring the image with Copic Markers.  I thought of putting a ribbon around it or some other embellishment, however, I've decided to make this a design for myself for notecards and I like the CAS.  I also like that this design leaves me room to add embellishments if I want to. 

So have some fun with us and join in my Tuti Frutti/Food Happy challenge.  Head on over to The House That Stamps Built for the link to link your creation.  You might just win a $25.00 gift certificate for some awesome RI Rubber. 

Check out my awesome Rock Star teamies and their super creations for more inspiration with this challenge.

 
Thanks so much for stopping by!


Tuesday, September 10, 2013

STAMPTV CSS TEAM SEPTEMBER INSPIRATION CHALLENGE

Hi blog friends!!!

Here we are with a fabulous inspiration blog hop from the StampTV CSS Team. 

If you've come here from the exceptionally talented Betty's blog, then you're in the right place.  If you didn't see Betty's blog, head on over to the BEGINNING of the hop where you can traavel along without missing one incredible project from this group. 

Our inspiration is this gorgeous image from Joy.  Thanks, Joy!


I loved all the texture and brilliant colors of this card and I tried to capture some of them in my card. 

 
Stamps used:  "Heartfelt" by Theresa Momber. 
 
Thank you for stopping by.  If you're as inspired by this image as we are, we hope you'll join us by posting your creation to the forum thread so we call can be inspired by you. 
 
Now, hop on over to my super talented teamie, Geri's blog and see what fabulous project she has in store for you. 


Monday, September 9, 2013

MAGICAL MONDAYS - PROJECT OF THE WEEK AT REPEAT IMPRESSIONS

Hi Blog friends!

I'm really excited to share a Project of the Week with you for The House That Stamps Built and Repeat Impressions stamps this week.  

I'm a true technique junkie and love trying new ways to create cards and projects that's why I'm looking forward to these new weekly Magic Mondays and we hope you do too. 

For my project I chose to share with you a technique called "Blackboard" or "Calkboard" Technique (I've seen it titled both ways). 


For this card I used Repeat Impressions Stamp #8402-M "My Sunshine". I doodled some hearts around the image as well as adding some dots with my pencil and then again with my white pen and colored them in with coordinating colored pencils. My background was created with scraps that I embossed in various embossing folders. I used a small heart punch and punched some tiny hearts and added some butcher twine for embellishments.
 
This is a very simple technique and one which uses supplies I think most of you may already have. 


Watermark ink (I used VersaMark)
Embossing powder tool like an emossing buddy (I use the EK Success Powder Tool)
White Embossing Powder
A white pencil and/or white pen
White Pigment Ink
Heat gun (not shown)
 
The process: 
1.  Cut piece of black card stock the size you desire for your choosen stamp. 
2.  Prepare it with the embossing buddy powder tool to keep the embossing powder from sticking to areas outside your stamped image. 
3.  Stamp your image onto the card stock with the watermark ink.
4.  Sprinkle with white embossing powder.
5.  Heat set with heat gun.
6.  Trim card stock panel if desired, then with your finger, spread small amounts of white pigment ink along the outside edges of the cs and around the embossed image.  Add more if desired around areas - make it look a little smudgy, as if it's an erased blackboard. 
7.  You can add your own little doodles to the image with your white pencil if desired. 
8.  Finish card as desired. 


A few of you may recall this card that I posted for an earlier challenge at The House That Stamps Built using this technique.
 
The stamps I used for this are #2914-I "Duck Takeoff" and #1113-D "Happy Birthday". Other supplies are GKD Pure Luxury "Black Onyx" card stock and a scrap piece of Co'ordinations paper with black core.  The "twine" is just some white cotton embroidery thread I had. 
 
I hope you've enjoyed my project and if it's new to you, I hope you'll give it a try. 
 
Thanks for stopping by,


Blog Archive

I hope you enjoy some of my cards

Please sign my guest book