Monday, May 11, 2015

PROJECT OF THE WEEK AT THE HOUSE THAT STAMPS BUILT

Hi there!    

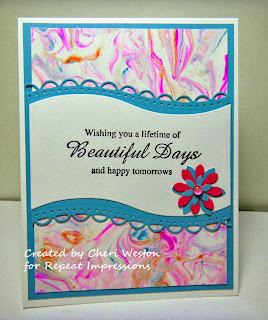
Cheri here and I'm very excited to be bringing you another project of the week for The House That Stamps Built blog.  I've chosen a technique that many of you have seen before.  It's an easy technique that renders a different look no matter how many times you do it, and therefore gives endless stunning results.  It's simply called the shaving cream technique and here is how it's done.

The supplies are basic and simple; shaving cream (the cheapest works great), but avoid any with additives or the gel type.  They may affect the results with the inks or paints you might use.  An assortment of dye ink refills or acrylic paints.  Popsicle sticks for stirring, a tray to layer the shaving cream on (or paper plate), I used an old cookie sheet.  A heavier card stock works best, 110# or 120# or watercolor paper works too.  A ruler or some straight edge tensile to scrape the shaving cream off the card stock with.  


The first thing you'll do is spray your tray with shaving cream


Smooth this out with your ruler or straight edge utensil

Next add your inks or paints in drops randomly over the shaving cream and using your Popsicle stick blend the colors in a marbling effect being careful not to over blend the colors.  


Once blended to your satisfaction, take your card stock (I always pre-cut mine to A2 size) and place it carefully face down onto the shaving cream.  


Carefully lift your cardstock from the shaving cream by grabbing opposite corners and lifting off the bed of shaving cream and ink.  Then using your ruler or straight edge utensil, in one stroke, scrap the excess shaving cream from the face of the card stock.

Dry your layers completely, either by leaving it to dry naturally or by using a heat gun.  I prefer drying it naturally.  Often times the card stock will bend and will not dry straight, but that's okay, you will fix that when you glue it against your card base layer.  

I did two different shaving cream projects.  With one I used dye ink refills and one I used acrylic paints.  


The Repeat Impressions Stamps used are:


I hope you enjoyed the project.  Thanks so much for stopping by.


3 comments:

Deonna B said...

Great Project Cheri! Love this technique!

Karen (TLgirl353) said...

So cool looking- I haven't done this technique in ages. Looks like you had fun!

Ina G said...

One of my favourite go to's SS. Love how they are never the same.And the paper smells so nice too.Fabulous tutorial and both cards are gorgeous (of course).

Blog Archive

I hope you enjoy some of my cards

Please sign my guest book